This post may contain affiliate links. Please see disclosure form more information.
Homemade Cheddar Potato Pierogi is my grandma’s pierogi recipe for boiled cheesy potato dumplings fried in butter and caramelized onions. The BEST pierogi! Make them for Christmas, Lent or anytime you’re craving authentic pierogi!

Table of Contents
This is hands-down the best pierogi dough recipe I’ve ever made, and I’ve tried several pierogi recipes over the last few years.
The homemade dough is easy to work with, and the cheesy mashed potato filling is loaded with flavor. If you want to make homemade potato cheese pierogi – pierogi ruskie – this is the recipe for you!
I got this recipe for pierogi from my grandma, who got if from her mother, and so on up the family tree. Baba would come over every Christmas Eve, and my mom and I would spend all morning helping her make these cheesy potato dumplings to eat for Holy Supper — Wigilia — that evening, along with nut rolls and haluski and plenty of fish!
My family is a mix of Ukrainian – Ruthenian – Polish – Russian – Slovak heritage, but these pierogi, or pedohe as we used to call them, are from my grandma’s Ukrainian side. My Polish relatives filled their Polish dumplings with a mix of farmer’s cheese — twarog — and mashed potatoes, but Grandma always filled hers with cheddar cheese mashed potatoes.
Since Baba lived in Pittsburgh, you could even call these Pittsburgh pierogi or Eastern European pierogi.
Ingredients
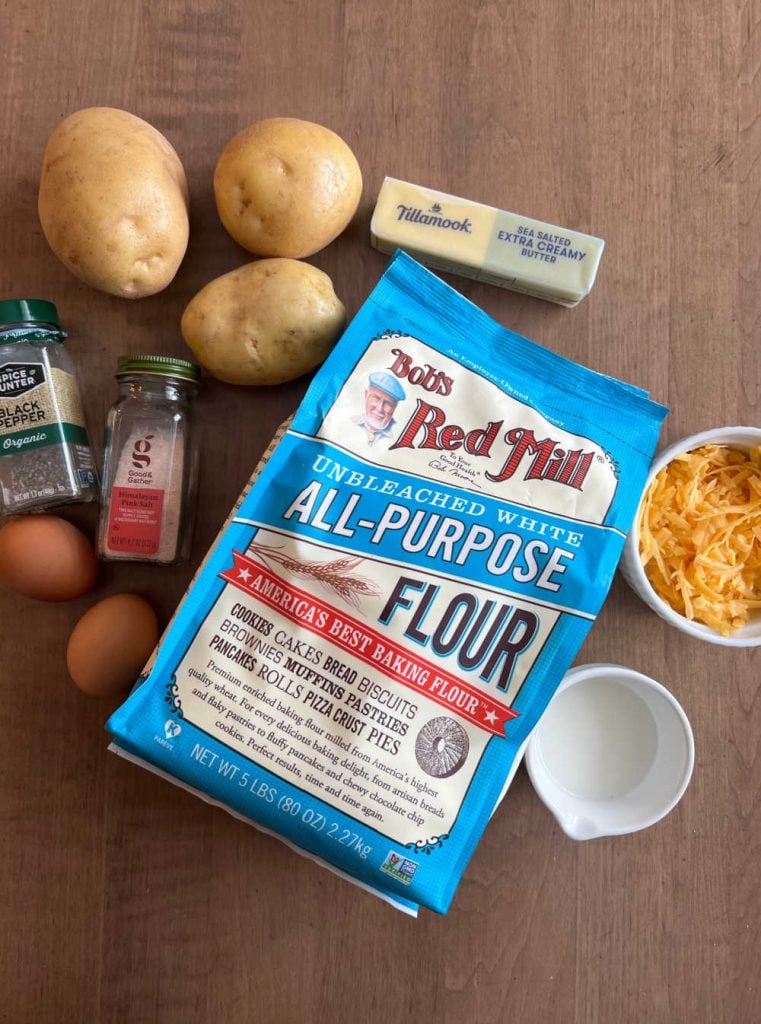
You only need a few simple ingredients for potato pierogi. They should be easy to find in your grocery store if you don’t already have these pantry staples at home.
- Flour — all purpose flour
- Potatoes — Yukon gold potatoes or russet potatoes work best
- Potato water — Save some cooking water from the potatoes for the dough
- Eggs
- Milk — for the dough and a splash for the cheesy potato filling
- Butter — room temperature butter for the dough and for frying perogi
- Salt and black pepper
- Onion — for frying pierogi
Note that there is no sour cream in the dough. The potato water and milk give the homemade dough a wonderful texture.
Making pierogies isn’t hard — You’re basically making a simple filled pasta. But, it takes a lot of time and energy to complete the whole process, and it’s easier if you have as much help as possible. For us, it’s definitely a family project, but I’m beyond thrilled that I can hand this recipe down to my own kids. And honestly, we have a lot of fun in the process!
How to Make Pierogi
This homemade pirogi dough uses potato water left over from boiling the potatoes for the filling.
So, cooking the potatoes is the first step in this potato pierogi recipe. I use Yukon Gold potatoes, and I leave the skins on while boiling them. It’s a cinch to peel the potatoes while they’re warm!
Just cut the potatoes into smaller pieces. I usually quarter them. Then cook in a large pot of boiling salted water until fork tender.

Reserve 1 cup of the potato water and set aside. Drain the potatoes, and allow to cool slightly. Place potatoes back into the pot or in a large bowl.
Then, remove the skins, and mash potatoes with the cheddar cheese using a potato masher in a large bowl. You can add a splash of milk to make the potatoes a little creamier. But the potato cheese filling is best when it’s firmer.
Then, refrigerate the cheddar cheese mashed potatoes until you are ready to assemble the pirogi.
You can make pierogi dough by hand or use a stand mixer or food processor. The stand mixer is much easier!
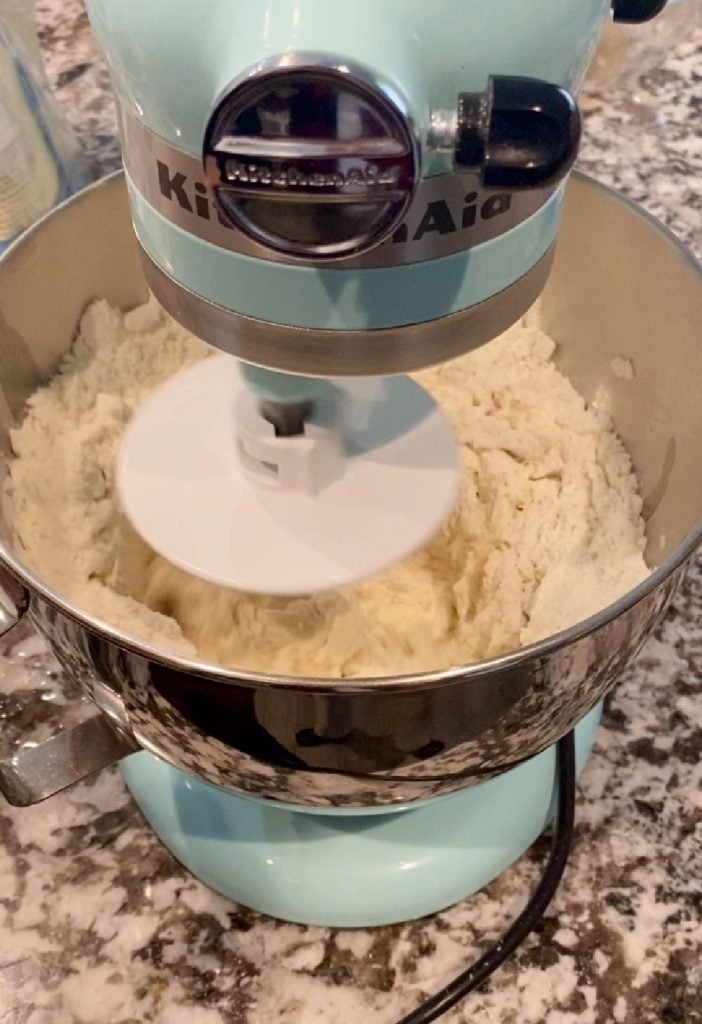
Add the flour to the bowl of a stand mixer fitted with a dough hook. Then, add the salt, and use a fork to mix together. Add the butter, milk and eggs, and mix on medium speed. Gradually add enough potato water for a dough ball to form.
When the dough is no longer sticky, take it out of the mixer. Wrap the ball of dough in plastic wrap and let rest in the refrigerator for 20 minutes.
It’s important to let the dough rest for at least 20 minutes after you’re done kneading it. This step will make it very easy to roll out!
Cut the dough ball into 4 sections. Place 1 section at a time on a lightly floured surface. Cover the other sections with a clean kitchen towel.
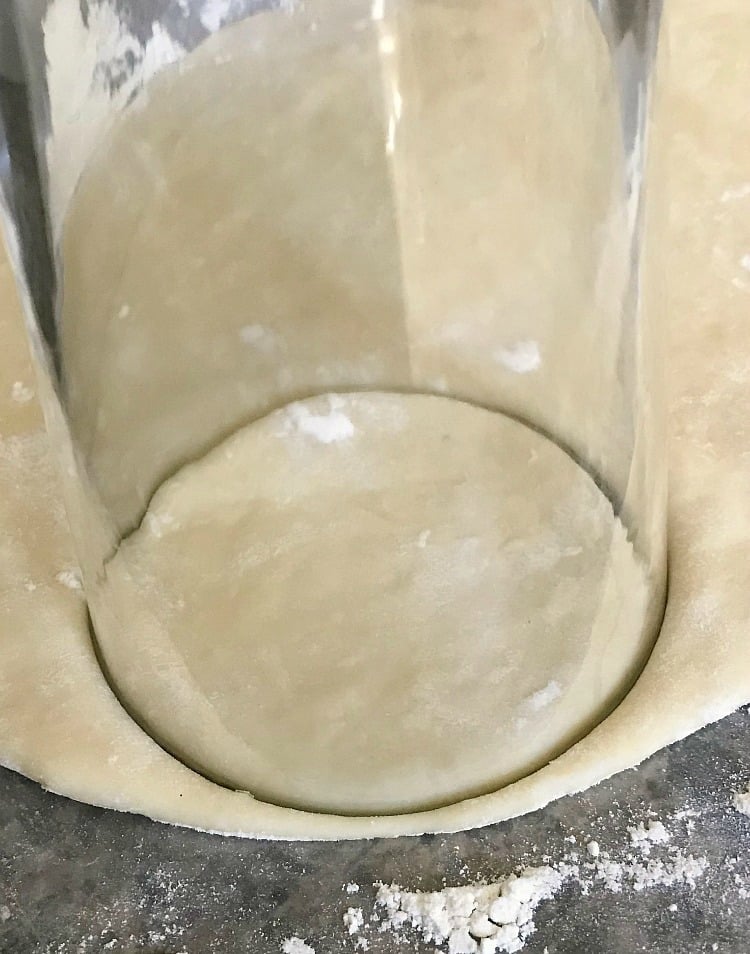
Then, roll dough out with a rolling pin on a lightly floured surface into a rectangle about 1/8 inch thick.
Use a drinking glass about 3 inches wide or cookie cutter to cut circles out of the dough.
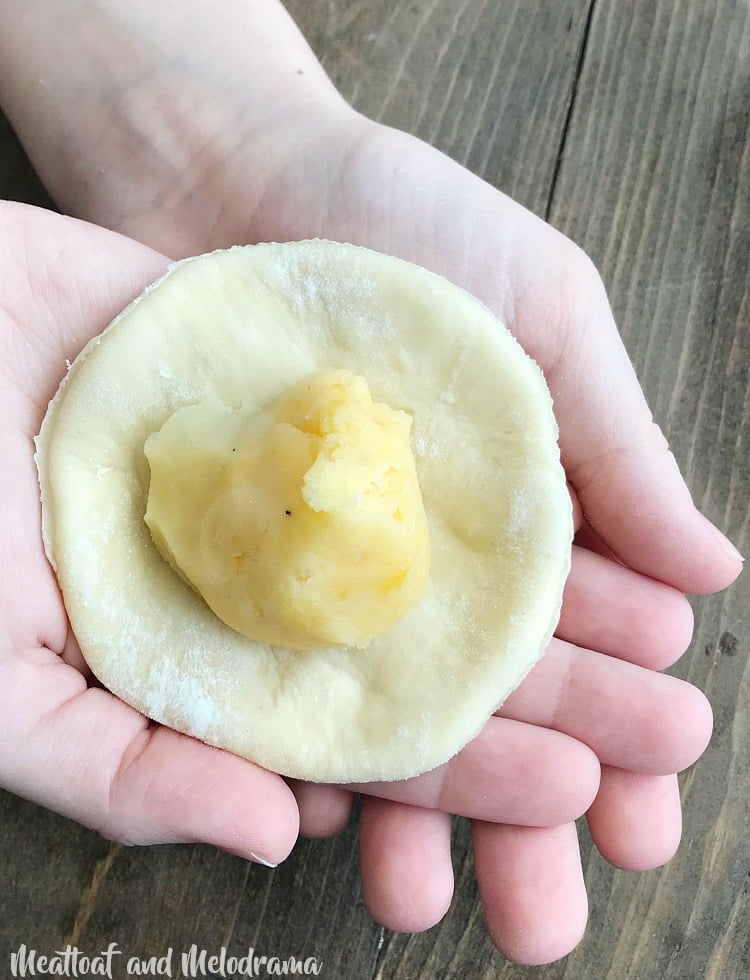
Use a tablespoon to scoop out some of the cheddar potatoes, and place a spoonful in the center of the circle.
Next, you fold one edge of the dough circle over the potato filling so that the edges of the dough meet. Dip your fingers in a little cold water. Then, pinch, pinch, pinch the dough so that it’s completely closed.
Place pierogi on a lightly greased baking sheet lined with foil. Keep them covered until you’re ready to cook them.
One of my girls made up a little song and dance about pinching the pierogi dough when she was younger. Good times!
Seriously though, letting kids help with this homemade pierogi recipe is a great way for kids to get involved in the kitchen!

How to Cook
Next, you boil the pierogi in a large pot of salted water. Bring water to a gentle boil, and add a few pierogi at a time. Gently stir so that they don’t stick.
When they rise to the top, after 3-5 minutes, they’re done. You could stop at this point, since they’re technically cooked. But, you really, really, should take it a step further.
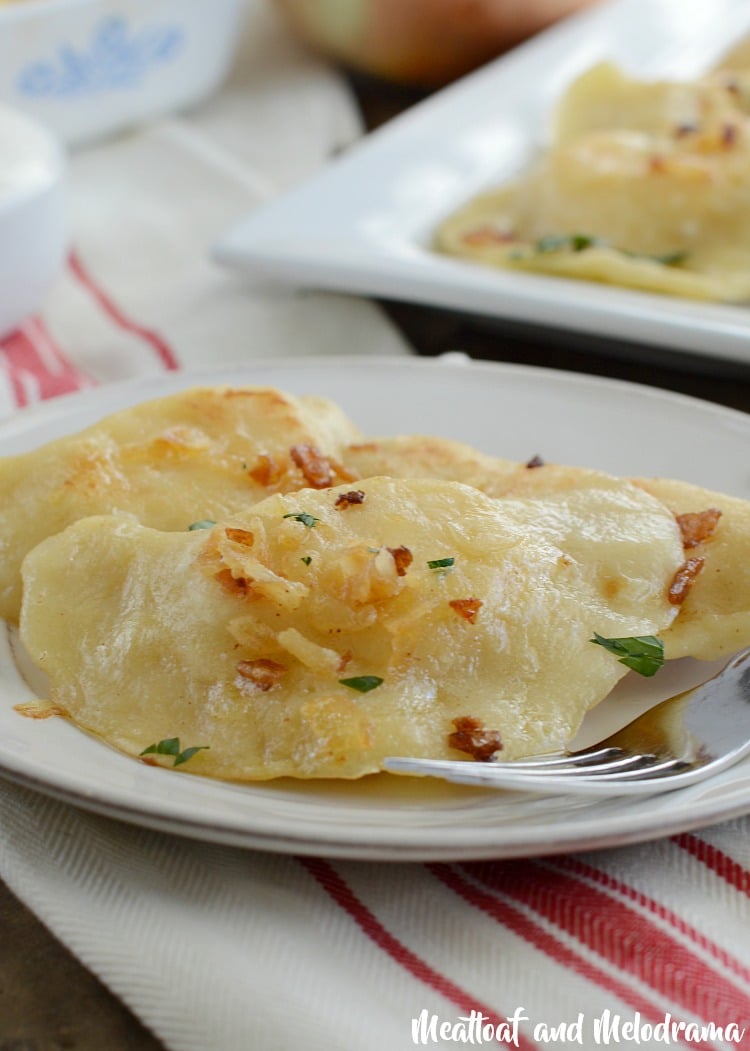
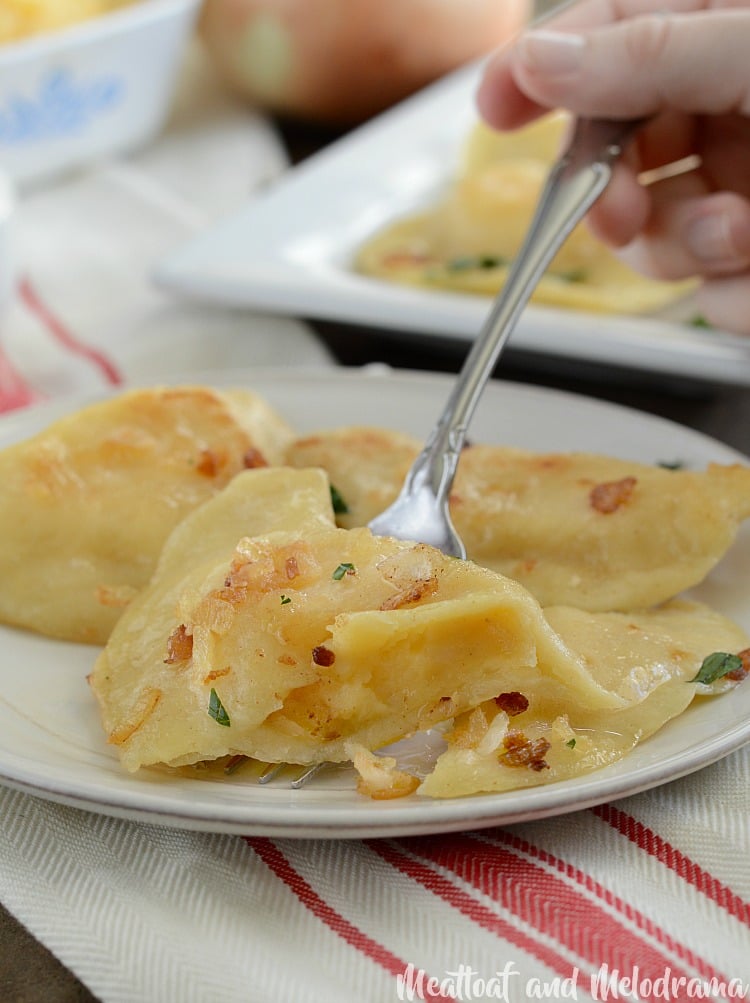
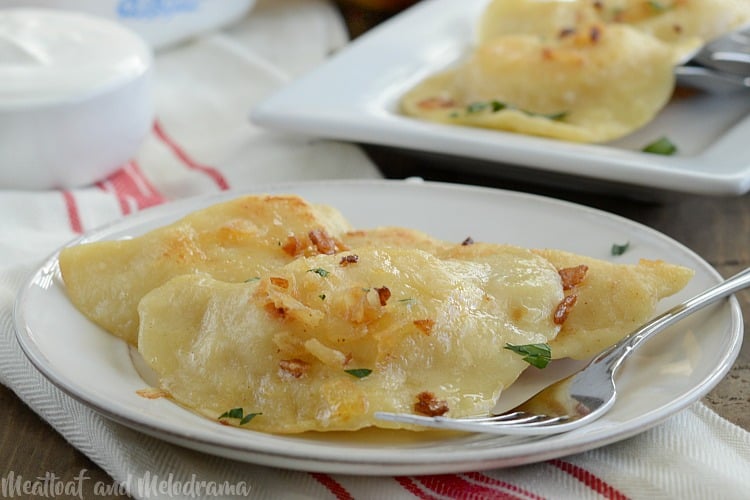
We like to pan fry the boiled pierogi in a large skillet filled with melted butter and caramelized fried onions until golden brown, which really makes the pierogi taste incredibly delicious!
Start cooking the onions in 1-3 tablespoons butter over medium heat while the potato dumplings boil. Then, use a slotted spoon to scoop the pierogi out of the water into the frying pan.
I prefer my pierogi a little soft in the center, while the Hubs prefers his crispy. So, I make them both ways, and everybody is happy.
If you haven’t guessed by now, this homemade Polish pierogi is not a low-fat recipe! But, don’t let that stop you from making and eating homemade pierogi! It’s definitely a treat!
Tips for Making Potato Cheese Pierogi
- Use Yukon Gold potatoes for the filling, and boil the potatoes with the skin on for easy pealing
- Reserve 1 cup of potato water for the dough. You may not use all of it
- Knead the dough until it’s no longer sticky, and your hands are clean after handling the dough
- Allow at the dough to rest for at least 20 minutes before rolling
- Divide dough into 4 sections, and work with 1 section at a time
- Use an assembly line system for quicker pierogi making
- Keep dough covered with clean kitchen towel to prevent drying out
- Dip fingers in water to help seal the dough while forming the pierogi
- Freeze pierogi after you make them to cook later
Variations
You can use any filling with this homemade pierogi dough recipe. Substitute warm water for the potato water. My grandma would make sauerkraut filling and prune filling – lekvar – along with potato. You can also use leftover mashed potatoes.
Love spice? Add 1 chopped and seeded jalapeño pepper to the cheesy potato filling. So good!
Instead of cheddar cheese, you can use cottage cheese, cream cheese or farmer’s cheese for a more traditional Polish pierogi recipe.
Grandma used to cut strips of dough into rectangles instead of circles. This way, you have very little scraps of dough left over.
How to Freeze and Store
You can freeze pierogi either right after you make them or after you boil them. To freeze uncooked pierogi, place them in a single layer on a lined baking sheet in the freezer. Once frozen, you can place them in a freezer bag and store for up to 3 months. No need to thaw frozen pierogi — just drop them in boiling water to cook!
To freeze boiled pierogi, allow to cool completely in a single layer. Then, place in a freezer bag or freezer safe container for up to 3 months.
You can store leftover pierogi in your refrigerator for up to 4 days in an airtight container, if you happen to have leftovers!
FAQ
You have to boil homemade pierogi first since you are working with raw dough. You can pan fry pierogi after boiling for extra flavor and a crispier texture. Or, serve with sour cream and melted butter and chives right after boiling.
Use leftover cheesy mashed potatoes in pierogi stuffed shells, pierogi lasagna or make mashed potato pancakes for dinner.

Homemade Cheddar Potato Pierogi
Ingredients
For the Pierogi Dough
- 5 cups flour
- 1 teaspoon sea salt
- 2 large eggs
- 1 tablespoon butter, softened
- 1 cup lukewarm potato water
- ½ cup milk
For the Cheddar Cheese Potato Filling
- 5 Yukon Gold potatoes about 2 pounds
- 3 cups shredded sharp cheddar cheese
- ½ cup milk (optional)
- 1 teaspoon sea salt
- ½ teaspoon ground black pepper
Instructions
For the Filling
- Add potatoes to a large pot, add enough cold water to completely cover potatoes, and boil in salted water until fork tender
- Reserve 1 cup of water, drain, peel potatoes, add cheese, salt and pepper, and mash with fork or potato masher until blended. Add the milk to make potatoes creamier, if needed. Season with additional salt and pepper, if needed
- Set aside
For the Dough
- In a large bowl, stir the flour and sea salt together, and push aside to form a well in the bowl. Or, use a stand mixer with dough hook
- Add eggs in the center, then the butter and milk, and start mixing dough with fork or dough hook in mixer
- Gradually add the potato water, and mix until dough starts to form. Add enough water to form a ball, and knead until no longer sticky. You may not need to use all the water. Add more water if too dry or more flour if dough is still too sticky
- Wrap dough ball in plastic wrap, and refrigerate for 20 minutes to rest
- Divide dough into 4 separate pieces, and keep covered to prevent drying out
- Roll out one piece at a time on a floured surface about ⅙ inch thick, and cut out circular shapes with a drinking glass or round cookie/biscuit cutter about 3 inches in diameter
- Place a tablespoon full of potatoes in center of dough, fold ends over, and pinch together. Dip fingers in a bowl of water to help seal dough
- Place pierogi on lightly greased cookie sheet until dough is used up, and keep covered until ready to boil
- Bring a large pot of salted water to a gently boil, and boil pierogi, a few at a time, stirring once or twice so they don't stick, until they float to surface
- Remove with slotted spoon, and serve. Or, sauté chopped onion in butter over medium heat until golden brown. Then, fry pierogi with butter and onions until golden brown and onions are caramelized before serving. Add more butter as needed.
Notes
Nutrition
Nutrition information is automatically calculated, so should only be used as an approximation.
I hope you enjoy my grandma’s pierogi recipe as much as we do! It’s the ultimate comfort food. For more Polish food and recipes from Eastern European countries, check out my halupki recipe, Easter cheese recipe and Easter lamb cake recipe.
If you try these homemade pierogies, please leave a star rating and comment. For more tried and true recipes, be sure to sign up for the weekly newsletter and follow along on social media.
Happy Cooking,


I learned how to make these from a friend, time to make some again. I’ve got this bookmarked to try.
I hope you like them, Sid. I wish I had time to make them more often! 🙂
We are total pierogi heads in my house! I can’t wait to try yours!
How many eggs? they aren’t listed in your ingredients but the dough requires them!
Oops, So sorry! — 2 eggs. That’s what I get for typing late at night.
I love potato pierogi! Your look absolutely fantastic!
I have never heard of Pierogi before! This looks and sounds so good!
These sound fabulous!
I have to try this out! They look so good!
These are my husband’s favorite!! He’s going to flip when he sees I’ve made these for him! Thank you!
I remember when my college roommate introduced me to pierogis for the first time! I’ve never thought about making them homemade. Challenge excepted!
I grew up eating Pierogi and LOVE them. I never thought to make them on my own. I am definetly trying this recipe!! You make it look so easy.
Thanks, Kristen. It’s not that hard to make pierogi, but it takes a long time! Definitely worth it, though! 🙂